How to Uninstall Razer Synapse Safely on Windows and Mac
If you are searching for how to uninstall Razer Synapse, start with a backup and the supported removal path. Close Razer processes, export profiles and macros, uninstall the installed Razer software, restart, and use the Driver Clean-up Tool only when ordinary removal or repair has failed.
Sources checked August 11, 2026: Razer's Windows uninstall, Mac uninstall, reinstall, Synapse 4, and Driver Clean-up Tool support pages were checked. This guide does not host installers or invent a direct download URL.
Choose your operating system and goal. Add a device name or RZ model number for an extra compatibility reminder.
Runs locally in your browser
Your recommendation will appear here
The result includes platform requirements, the reason for the recommendation, and a verified Razer source link when one is available.
Quick answer
What to do before removing Razer Synapse
Checked Aug 11, 2026
Back up first
Export important profiles, macros, DPI stages, button assignments, and Chroma settings. The Razer Synapse profiles guide explains the backup and import boundary.
Normal order
Close Razer apps, use Windows Installed apps or the supported Mac uninstaller, complete the removal, and restart before judging what remains.
Windows 11 path
Search Installed apps for Razer, start the official removal flow, then choose Uninstall All in the Razer Gaming Software window when it appears.
Mac path
Open Finder > Applications > Razer, then use Razer Uninstaller.app and follow its confirmation dialog. Do not delete random application-support folders first.
Cleanup tool
The official Driver Clean-up Tool is an escalation step after normal uninstall and restart. It is not the first choice for every profile or launch problem.
Download policy
This page links to stable Razer support pages. It does not claim a latest installer version, permanent file size, checksum, or safe third-party mirror.
Official Razer screenshots
The supported Windows removal flow
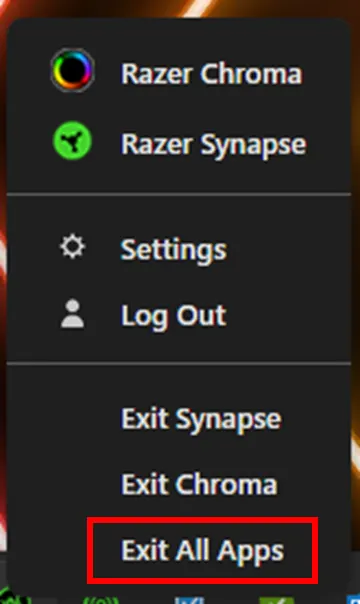
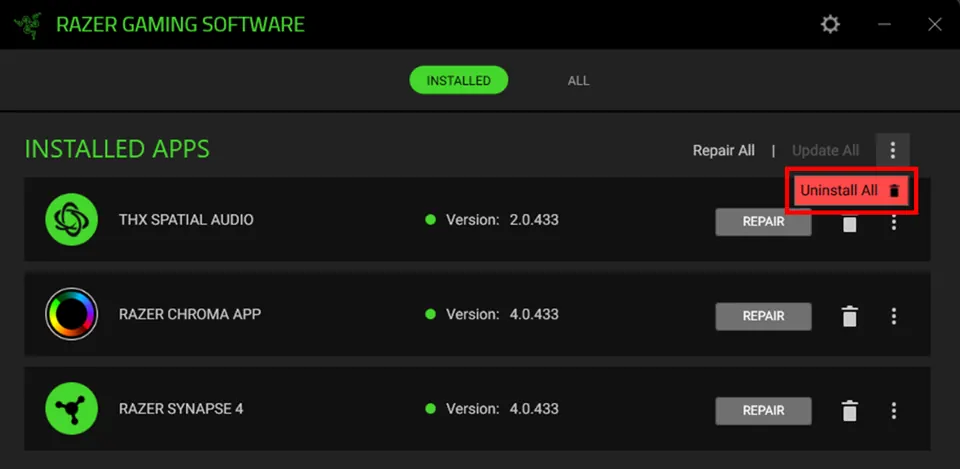
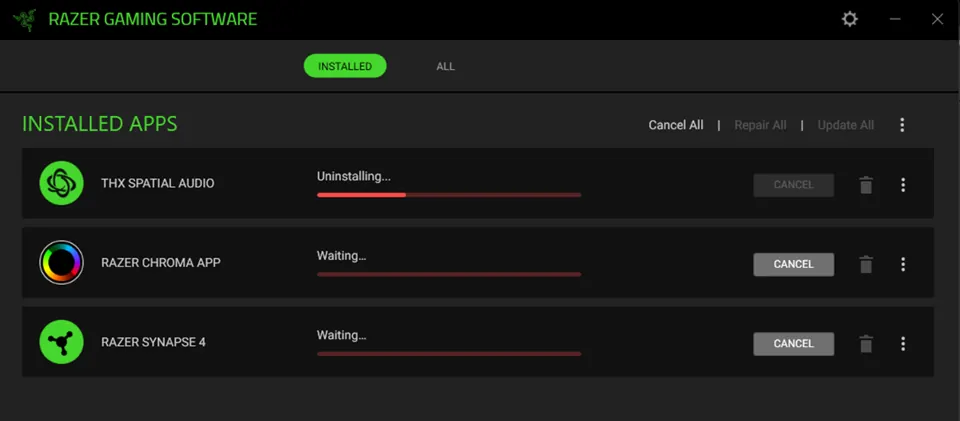
These first-party Razer Support screenshots show the three checkpoints that matter most: exit the running apps, choose the supported removal option, and wait for completion before restarting.
Exit all Razer appsClose Synapse and related Razer processes before launching the uninstall flow.Razer Support sourceChoose Uninstall AllUse the supported Razer Gaming Software removal option instead of deleting program folders manually.Razer Support sourceWait for completionLet the removal finish, close the window, and restart Windows before testing devices or reinstalling Synapse.Razer Support source
Before removal
Before you uninstall Razer Synapse
Uninstalling Synapse can remove the software layer that stores or applies device mappings, lighting effects, macros, and application links. If those settings matter, open the app while it still works and export a known-good profile. Keep the export outside the Razer program folder and record the device model, Synapse branch, and date. A cloud-linked Razer ID may preserve some settings, but it is still safer to keep a local backup before removal.
Separate the goal before clicking Uninstall. If Synapse opens but one device is missing, the device detection guide may be safer. If the app will not launch, start with the not-opening guide. If the installer itself fails, use the download and installation guide. Removing the whole application is reasonable when you are changing software branches, preparing a clean repair, or intentionally leaving the Razer software behind.
Close games, overlays, RGB utilities, and other tools that may use the same device.
Keep the official support link and your exact device model available.
Do not start by deleting registry keys, services, or folders with an unknown purpose.
Windows steps
How to uninstall Razer Synapse on Windows
For Synapse 4 on Windows 10 or Windows 11, begin by right-clicking the Razer Synapse icon in the system tray and choosing Exit All Apps. Then open Windows Settings, go to Apps and Installed apps, search for Razer, and start the uninstall action. Windows may show a User Account Control prompt; confirm it only when you initiated the official Razer removal flow.
The Razer Gaming Software window can expose another menu after the Windows step. Open the menu in the upper-right corner of the Installed Apps tab and choose Uninstall All, then confirm the uninstall. Wait for the progress window to finish, close it, and restart the PC. Do not judge the result while the old Razer processes are still running, and do not repeatedly launch the installer during the same removal session.
Exit all Razer apps from the system tray.
Open Settings > Apps > Installed apps and search for Razer.
Confirm the Razer Gaming Software removal prompt and choose Uninstall All when offered.
Wait for completion, close the window, and restart Windows.
Mac and legacy paths
How to remove Synapse on Mac and legacy installs
Razer's Mac support path is different from Windows. In Finder, open Applications, find the Razer folder, and double-click Razer Uninstaller.app. Choose uninstall in the dialog and allow the process to finish. This is safer than dragging random Razer folders to the Trash because the uninstaller can handle the components the current Mac package expects.
Synapse 2 is a legacy branch with different support and profile behavior. If you are removing Synapse 2 on Windows, back up the profile first and follow Razer's version-specific clean-reinstall instructions before touching hidden folders or leftover files. Do not apply Synapse 2 paths to Synapse 4 by guesswork. If your objective is to migrate rather than remove, read the Synapse 4 guide and the profile migration guidance first.
Use Finder > Applications > Razer > Razer Uninstaller.app on Mac.
Follow the uninstaller dialog instead of deleting support folders manually.
Treat Synapse 2 as a legacy branch with separate instructions.
Choose migration guidance instead when you are changing branches rather than leaving Synapse.
Blocked uninstall
Razer Synapse won't uninstall: use a safe recovery order
If Windows says the app is open, return to the system tray, exit Razer Central and Synapse, and check Task Manager for a clearly identified Razer process. End only a process that belongs to the app you are removing, then retry once. If the uninstaller reports a missing path, a permission error, or a pending restart, record the exact message and restart before making a broader change. A different installer or a random “Razer uninstaller” download can hide the real cause and create a second problem.
If the ordinary flow still fails, separate repair from removal. Razer's official reinstall guidance can be used when the goal is to return to a working installation, while the Driver Clean-up Tool is an escalation for remaining driver conflicts. Do not disable security software permanently, delete services from a forum script, or remove unrelated drivers just because Synapse is stuck. Keep profiles and logs safe before the next step.
Close the app and end only clearly identified Razer processes.
Restart for pending updates, locks, or unfinished installers.
Use official repair or reinstall instructions when the goal is recovery.
Escalate to the official cleanup tool only after ordinary uninstall fails.
Cleanup boundary
When to use the Razer Driver Clean-up Tool
The Driver Clean-up Tool is not a faster version of the normal uninstall and it is not a general-purpose PC cleaner. Razer's current support page places uninstall first, then the cleanup utility, a reboot, and reinstall. Use that order when old drivers, a failed repair, or repeated device-detection conflicts remain after the normal software removal. The existing Driver Clean-up Tool guide covers the file and recovery checks in more detail.
Before running any cleanup utility, disconnect non-essential Razer devices, keep the official source open, create a restore point when practical, and save the profiles you may need later. The cleanup step can affect driver state, so it should be treated as a controlled repair operation. It is not evidence that a third-party “driver fixer” or mirror is trustworthy, and it does not justify publishing a guessed direct file link.
Normal uninstall and restart come first.
Use the official Razer cleanup source and verify the tool name before running it.
Keep profiles, logs, and a restore path before changing driver state.
Reinstall only from an official Razer support or product page.
After removal
What to check after uninstalling
After the restart, confirm that the Razer processes you intended to remove are no longer running and that Windows or macOS is still responsive. Test the basic keyboard, mouse, headset, or other device without assuming that every advanced lighting or macro feature should remain. If the device works as a standard input or audio device, the remaining problem may be software configuration rather than hardware failure.
If you plan to reinstall, use the official Synapse page, verify the platform and device support, and reconnect devices in a controlled order. Import one known-good profile first, test it, and only then restore additional profiles or macros. If you are leaving the software uninstalled, remove old shortcuts and record the date so a later support request does not confuse the old branch with a new installation.
Restart before checking services, devices, or the next installer.
Test basic device operation separately from Synapse-only features.
Reinstall from an official Razer page if needed.
Import one known-good profile first and test before restoring more settings.
Final checklist
Razer Synapse uninstall checklist
A removal is complete when the backup is safe, the supported flow has finished, and the next action is clear.
1
Backup is outside the program folder
Profiles, macros, mappings, and Chroma settings can be found later without relying on a removed installation.
2
The correct branch was removed
You distinguished Synapse 4, Synapse 2, Mac, repair, migration, and driver cleanup instead of mixing their paths.
3
The official removal completed
Razer apps were closed, the supported uninstall flow finished, and the computer was restarted before testing.
4
The escalation is justified
The Driver Clean-up Tool is used only for remaining driver conflicts or failed normal removal, not as a first download.
If any check is uncertain, stop before deleting more files. Keep the exact error, device model, operating system, and Razer support source in your notes so the next repair step remains reversible.
Close all Razer apps, open Windows Settings > Apps > Installed apps, search for Razer, start the official uninstall flow, choose Uninstall All in the Razer Gaming Software window when it appears, wait for completion, and restart Windows.
Why can't I uninstall Razer Synapse?
The app may still be running, Windows may be waiting for a restart, or the installation path may be damaged. Close clearly identified Razer processes, restart once, and retry the supported flow. Do not start with random uninstallers or registry scripts.
How do I fully uninstall Razer Synapse?
Complete the supported uninstall first and restart. Only if leftover drivers or a failed repair remain should you follow Razer's official reinstall or Driver Clean-up Tool instructions. Do not assume that deleting every folder named Razer is required for Synapse 4.
How do I uninstall Razer Synapse and Chroma App on Mac?
In Finder, open Applications, open the Razer folder, double-click Razer Uninstaller.app, and follow the uninstall dialog. Mac and Windows use different removal paths, so do not copy Windows folder instructions to macOS.
Will uninstalling Razer Synapse delete my profiles and macros?
It can remove the software that applies those settings, and a damaged or legacy installation may leave you without an easy recovery path. Export important profiles and macros before removal, keep the files outside the Razer folder, and import one known-good backup after reinstalling.
Should I use the Razer Driver Clean-up Tool first?
Usually no. Razer's current cleanup sequence puts normal uninstall first, followed by the cleanup tool, a reboot, and reinstall. Use the official utility when driver conflicts or failed removal remain, not as a generic cleaner or a replacement for backing up profiles.